
Recently, I started looking into building a widget for my phone that shows my Xbox data, and it was a bit of struggle to get the authentication correct and getting the data I needed from the REST API’s. I came across many third-party services that could have made this easier, but they all had some limits on the usage. After spending some time, I was able to figure out the authentication and how to use that with the Xbox APIs documented. I am creating this guide for enthusiasts like me to get the data they are looking from Xbox.
Authentication
For all Xbox Services listed, they need authentication to be included as Authorization header in the below format
Authorization: XBL3.0 x=<user_hash>;<xsts_token>We need two pieces of information for us to be able to authenticate with Xbox services – User hash and XSTS token. It’s a 3-step process, which involves
- Signing into Microsoft Account using OAuth 2.0
- Using the Microsoft Access Token to get an Xbox Live Token
- Using the Xbox Live token to get User Hash and XSTS Token
Signing into Microsoft Account using OAuth 2.0
The first order of the process here is to be able to Sign into Microsoft account using OAuth 2.0, to get an access token and refresh token. To do that, first you need to create an application in Azure. I am assuming you have an account in Azure, if not you can Sign up for free.
- Go to Azure Portal and search for App Registrations.
- In App Registrations, Click on New Registration.
- Provide a name for your application and choose Personal Microsoft Accounts only.
- For Redirect URI, choose platform as Web and provide
https://oauth.pstmn.io/v1/callbackas the value. This is important, as we will be using Postman to generate Access and Refresh Token. - Click on Register
- Once the App is registered, go to the App and under Overview tab, copy and save the Application (client) ID.
- Next, go to Certificates & secrets, click on New client secret, choose when you want the secret to expire and click on Add to generate client secret.
- Copy the Client Secret value and save it.
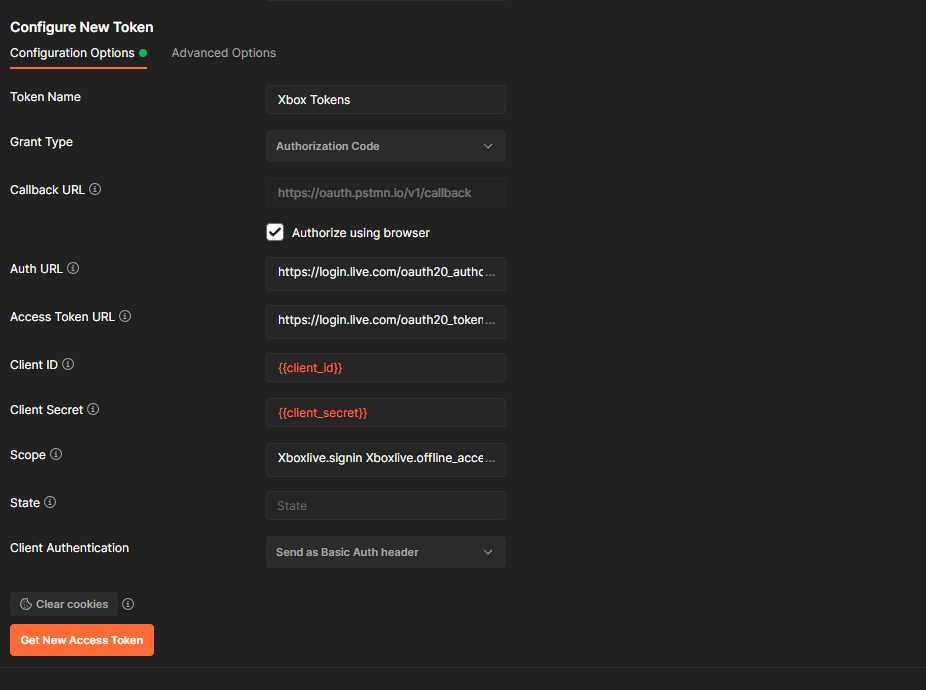
With Client ID and Client Secret in our hands, the next step is to Sign In and generate Access and Refresh tokens. We will use Postman to help with this.
- Open Postman and create a New Request/ Collection.
- Under Authorization, change the type to OAuth 2.0
- Change the Grant Type to Authorization Code.
- Under Callback URL, check Authorize using browser. This will disable editing the Callback URL and it should be defaulted to the value we set when creating an Application in Azure.
- Set Auth URL as https://login.live.com/oauth20_authorize.srf
- Set Access Token URL as https://login.live.com/oauth20_token.srf
- Set Client ID and Client Secret to the values we obtained from previous section.
- Set Scope as Xboxlive.signin Xboxlive.offline_access
Your configuration should like below at this point.
Click on Get New Access Token button, which should launch the browser in postman for you to Sign In with your account. Complete your Sign In with your credentials and if it’s successful, Postman should now show you the Access Token and Refresh Token that got generated.
Copy and Save the Access and Refresh Token securely.
Using Microsoft Access Token to get an Xbox Live Token
The next step is to Authenticate with Xbox Live and get an intermediate Access Token. To do that you need to make the below request.
POST https://user.auth.xboxlive.com/user/authenticate
{
    "Properties": {
        "AuthMethod": "RPS",
        "RpsTicket": "d=<Microsoft Access Token>",
        "SiteName": "user.auth.xboxlive.com"
    },
    "RelyingParty": "http://auth.xboxlive.com",
    "TokenType": "JWT"
}
This would return the below response
{
    "IssueInstant": "2022-11-16T14:28:00.667075Z",
    "NotAfter": "2022-11-30T14:28:00.667075Z",
    "Token": "<XBL Token>",
    "DisplayClaims": {
        "xui": [
            {
                "uhs": "<User Hash>"
            }
        ]
    }
}
Save the token returned in the above response, it’s the Xbox Live Token.
Using the Xbox Live token to get User Hash and XSTS Token
With Xbox Live Token, the next step is to get the User Hash and XSTS Token needed for Authorization of Xbox Services. To do that make the below request
POST https://xsts.auth.xboxlive.com/xsts/authorize

{
    "Properties": {
        "SandboxId": "RETAIL",
        "UserTokens": [
            "<XBL Token>"
        ]
    },
    "RelyingParty": "http://xboxlive.com",
    "TokenType": "JWT"
}
You will get the below response
{
    "IssueInstant": "2022-11-16T14:32:33.9488851Z",
    "NotAfter": "2022-11-17T06:32:33.9488851Z",
    "Token": "<XSTS Token>",
    "DisplayClaims": {
        "xui": [
            {
                "gtg": "The Shershah",
                "xid": "<xbox user id>",
                "uhs": "<User Hash>",
                 .....
            }
        ]
    }
}
Save the XSTS Token, User Hash and Xbox User ID from the above response. Now we are ready to get data for the user who logged in.
Making requests to Xbox Services
With XSTS Token and User Hash in our hands, we should be able to authenticate and retrieve data from any of the Xbox Services listed. Here’s an example of getting Xbox stats for logged in user
GET https://peoplehub.xboxlive.com/users/me/people/xuids(<xbox user id>)/decoration/detail,preferredColor,presenceDetail,multiplayerSummary

Authorization: XBL3.0 x=<User Hash>;<XSTS Token>
x-xbl-contract-version: 3
Accept: application/json
Accept-Language: en-US
Note that x-xbl-contract-version is documented in the link I shared above, and this value will change from service to service. Please refer to documentation for the correct value.
If all went well, you should receive a response similar to this
{
    "people": [
        {
            "xuid": "<xbox user id>",
            "isFavorite": false,
            "isFollowingCaller": false,
            "isFollowedByCaller": false,
            "isIdentityShared": false,
            "addedDateTimeUtc": null,
            "displayName": "The Shershah",
            "realName": "",
            "displayPicRaw": "https://images-eds-ssl.xboxlive.com/image?url=8Oaj9Ryq1G1_p3lLnXlsaZgGzAie6Mnu24_PawYuDYIoH77pJ.X5Z.MqQPibUVTcS9jr0n8i7LY1tL3U7AiafZ0kH6kQ1XDmkVT2tc3xb6.ub9bUTLBlHCHOLQ9165rD&format=png",
            "showUserAsAvatar": "0",
            "gamertag": "The Shershah",
            "gamerScore": "59420",
            "modernGamertag": "The Shershah",
            "modernGamertagSuffix": "",
            "uniqueModernGamertag": "The Shershah",
            "xboxOneRep": "GoodPlayer",
            "presenceState": "Offline",
            "presenceText": "Last seen 21h ago: Online",
            "presenceDevices": null,
            "isBroadcasting": false,
            "isCloaked": false,
            "isQuarantined": false,
            "isXbox360Gamerpic": false,
            "lastSeenDateTimeUtc": "2022-11-15T16:50:11.3389052Z",
            "suggestion": null,
            "recommendation": null,
            "search": null,
            "titleHistory": null,
            "multiplayerSummary": {
                "InMultiplayerSession": 0,
                "InParty": 0
            },
            "recentPlayer": null,
            "follower": null,
            "preferredColor": {
               ....
            },
            "presenceDetails": [
                {
                    ....
                }
            ],
            "titlePresence": null,
            "titleSummaries": null,
            "presenceTitleIds": null,
            "detail": {
               ....
            },
           ....
        }
    ],
   ....
}
Hope this helps.
Leave a Reply